


Introduction
When you try to connect your new door and window sensor with lights or switches from different brands, you quickly run into the same problem — everything lives in a separate app or ecosystem, making it difficult to build the automations you actually want.
Home Assistant fixes that. It's a free, open-source platform that unifies devices from any brand — local control, no cloud dependency, and automations that keep working even if your internet goes down.
This complete, up‑to‑date guide shows you how to add a Zigbee door/window sensor to Home Assistant in 2026, create practical local automations, and pick the best sensor for your setup.

Why Use a Zigbee Door/Window Sensor for Home Assistant?
When it comes to door and window sensors for Home Assistant, there are several protocol options available — Zigbee, Wi-Fi, Z-Wave, Bluetooth, and others — each with its own strengths and trade-offs. But if you prioritize local control, fast response, low power consumption, and stability, Zigbee remains one of the most popular choices for Home Assistant door and window sensors.
- Local Control: Connect directly to Home Assistant via ZHA or Zigbee2MQTT. Your automations run locally with no internet required, and your data stays private.
- Fast Response & Low Latency: Compared with many cloud-dependent devices, Zigbee typically delivers lower latency and smoother automation performance, with state changes usually reported in under a second.
- Low Power Consumption: Most Zigbee sensors offer excellent battery life of 1–2 years, and some models push even further.
- Reliable Stability: Zigbee devices form a self-healing mesh network that does not rely on the internet and is not affected by external network outages. When deployed properly — with enough mains-powered Zigbee router devices and good channel planning — Zigbee delivers long-term connection stability.
Best Zigbee Door and Window Sensors for Home Assistant
If you're looking for reliable Zigbee door and window sensors for Home Assistant, both the SNZB-04P and SNZB-04PR2 offer seamless integration via ZHA and Zigbee2MQTT.
They deliver reliable local automations, fast response times, long battery life, and built-in tamper detection, making them ideal for monitoring doors, windows, cabinets, drawers, closets, and other entry points around your home.
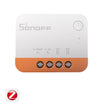
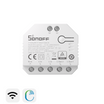
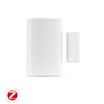
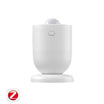
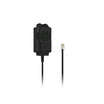
SNZB-04P: Long Battery Life & Low Maintenance

SONOFF Zigbee Door/Window Sensor | SNZB-04P
$15.90
【Door & Window Monitoring】Automatically turns on lights when a door or window is opened. Triggers audible and visual alarms for unauthorized entries and sends instant app notifications to keep you informed...
View ProductKey Features:
- Fully compatible with both ZHA and Zigbee2MQTT
- Instant open/close status reporting in Home Assistant
- 5+ year battery life (CR2477) for ultra-low maintenance
- Built-in tamper detection for security alerts
- Simple and quick installation with 3M adhesive
*Note: Keep the gap between the sensor body and the magnet within 20 mm (0.79 inches) when the door or window is closed.
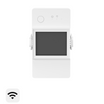
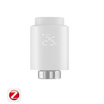
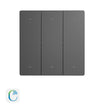
SNZB-04PR2: Slim Design & Versatile Installation

SONOFF SenseGuard DW Gen2 Zigbee Smart Door/Window Sensor | SNZB-04PR2
$13.90
【Slim and Discreet Design】Weighing only 45.1g, the smart door window sensor features a compact design that takes up minimal space and does not affect door or window operation or overall home aesthetics...
View ProductKey Features:
- Fully compatible with ZHA and Zigbee2MQTT
- Fast open/close status reporting in Home Assistant
- Slim body design for tight or narrow frames
- 3-year battery life with AAA batteries (affordable, widely available, and easy to replace)
- Built-in tamper detection (exposed in Home Assistant)
- Supports horizontal, vertical, and detached magnet installation
Home Assistant Features Supported by SNZB-04P & SNZB-04PR2:
|
Feature |
ZHA |
Zigbee2MQTT |
|
Opened/Closed Status |
✅ |
✅ |
|
History Record |
✅ |
✅ |
|
Tamper Alert |
✅ |
✅ |
|
Opened/Closed for a Duration |
✅ |
✅ |
|
Local Automation |
✅ |
✅ |
|
OTA Updates |
✅ |
✅ |
|
Battery Level |
✅ |
✅ |
SNZB-04P vs. SNZB-04PR2: Which One Should You Choose?
- Choose the SNZB-04P if you want maximum battery life and a low-maintenance, install-and-forget experience for long-term Home Assistant deployments.
- Choose SNZB-04PR2 if you need a slim design for narrow frames, easy-to-replace AAA batteries, or more flexible mounting options (horizontal, vertical, or detached magnet installation).

How to Add a Zigbee Door/Window Sensor to Home Assistant (ZHA & Zigbee2MQTT)?
Preparation
- A Zigbee door & window contact sensor (e.g., SNZB-04P / SNZB-04PR2))
- Home Assistant is installed and running
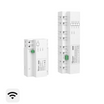
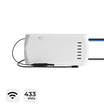
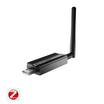
- A Zigbee Dongle (e.g., SONOFF ZBDongle-P/ZBDongle-E, PoE Dongle | Dongle-M, Dongle Plus MG24, Dongle-LMG21)
Add a Zigbee Door/Window Sensor via ZHA (Recommended for Beginners)
- Go to Settings → Devices & Services in Home Assistant
- Click Add Integration → Zigbee Home Automation (ZHA)
- Follow the setup wizard to complete Zigbee network initialization
- Go to Settings → Devices & Services → ZHA → Add Device to open the pairing window


- Put the contact sensor into pairing mode (usually hold the button on the sensor until the LED flashes)
- Wait a few seconds for Home Assistant to detect the device
- Once found, you can rename the sensor (e.g., Front Door Sensor, Bedroom Window Sensor) and assign it to a room for automation use.

Step 3: Confirm Device in Home Assistant:
Once added, the sensor will appear under Devices & Services → ZHA.
Typical exposed entities include:
- Open / Closed status
- Battery level
- Device availability
- Tamper status (if supported)
- Signal strength (LQI / RSSI)
- Activity logs

Add a Zigbee Door/Window Sensor via Z2M (Recommended for Advanced Users)
- Install and configure the MQTT broker (e.g., Mosquitto)
- Install Zigbee2MQTT in Home Assistant
- Enable "Permit Join" in the Zigbee2MQTT web interface
- Put your door/window sensor into pairing mode (same as above).
- The sensor will appear in Zigbee2MQTT – it then automatically shows up in Home Assistant with all its entities.
📖 Detailed step‑by‑step setup guide:
- How to Add Zigbee Devices to Home Assistant via MQTT – complete MQTT Broker setup and device sync walkthrough.
- SONOFF Zigbee Devices Work with Home Assistant via Zigbee2MQTT – Zigbee2MQTT installation and configuration guide.
Top 5 Door/ Window Sensor Automation Ideas in Home Assistant
💡 Auto lighting
🔔 Security alerts
❄️ HVAC control
⏱️ Open too long alerts
📭 Mailbox Alert
How to Automate Lighting with Contact Sensors in Home Assistant?
Automation 1: Door Opens → Auto Light ON
|
How it works |
Best for |
|
|
Sun-Based |
Only triggers after sunset, stops after sunrise — adjusts automatically with seasons |
Set-and-forget, no maintenance |
|
Fixed Time Window |
Triggers between set hours (e.g., 5 PM–7 AM ) — same every day regardless of weather |
Predictable, weather-proof control |
Step 1: Open the Automation Editor:
- Path 1: Go to Settings > Automations & Scenes > Create Automation > Create New Automation.
- Path 2: go to the sensor Device Page > click "+" icon in the Automations card > select Create New Automation.
- Click Add Trigger > select Device > Device.
- Device: select your door and window sensor.
- Trigger: select Opened.


- Click Add Condition > select Time and Location > select Sun.
- After: select After Sunset.


- Click Add Condition > select Time and Location > select Time.
- After: set your start time (e.g., 17:00:00 or 5 PM).
- Before: set your end time (e.g., 07:00:00 or 7 AM).
- (Optional) Check specific weekdays if needed


Step 4: Add an Action:
- Click Add Action > Device > click Device.
- Device: select your Light (it's usually the switch that controls your lights).
- Action: select Turn on.
- Save & Name: Click Save, and name it like "Door Opened - Turn Light ON"

Automation 2: Door Closes → Auto Light OFF
- Click Add Trigger > select Device > Device.
- Device: select your sensor.
- Trigger: select Closed.

- Click Add Action > Device.
- Device: select your Light.
- Action: select Turn off.
- Save & Name: Click Save, and name it like "Door Closed - Turn Light OFF".

Conclusion
FAQs
Q1: How do I add a Zigbee door and window sensor to Home Assistant?
Q2: Does a Zigbee door sensor work with Home Assistant without internet?
Q3: Should I use ZHA or Zigbee2MQTT for my door and window sensor in Home Assistant?
- ZHA — Best for beginners. It's built into Home Assistant, easy to set up, and works reliably for most door and window sensors.
- Zigbee2MQTT — Better for advanced users. Requires a separate MQTT broker, supports more devices, and offers deeper customization and more control—but comes with a more complex setup.
Q4: Can a Zigbee door/window sensor trigger automations in Home Assistant without any coding?
Q5: Do I need a Zigbee hub to use a Zigbee door sensor with Home Assistant?
Q6: How many Zigbee door and window sensors can I add to Home Assistant?
Q7: Can I use a Zigbee door sensor with Home Assistant for home security?
Q8: What is the difference between the SONOFF SNZB-04P and SNZB-04PR2?
Leave a comment
All comments are moderated before being published.
This site is protected by hCaptcha and the hCaptcha Privacy Policy and Terms of Service apply.