



Introdução
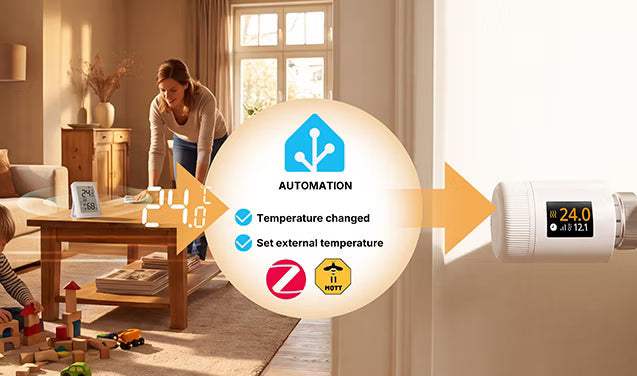
Uma válvula termostática de radiador inteligente instalada em um radiador pode ser afetada pelo calor do radiador, pelo ar frio próximo a uma janela e pela posição em que está instalada. Como resultado, a temperatura medida pelo sensor integrado pode ser maior do que a temperatura real do ambiente.
Se um sensor de temperatura separado já estiver instalado no ambiente, você poderá criar uma automação no Home Assistant para sincronizar a temperatura medida pelo sensor externo com a TRV. Sempre que o sensor de temperatura externo informar uma nova temperatura, o Home Assistant gravará o valor mais recente na TRV, permitindo que o dispositivo controle o aquecimento com base em uma temperatura ambiente mais representativa.
- Este tutorial usa o SONOFF TRV-ZBT como exemplo. O TRVZB de primeira geração também pode ser configurado seguindo este tutorial.
- O SONOFF SNZB-02DR2 é usado como sensor de temperatura externo. Outros sensores que possam informar a temperatura corretamente no Home Assistant também podem ser configurados da mesma forma.
Escolha o método ZHA ou Zigbee2MQTT (Z2M) abaixo, de acordo com a forma como sua válvula termostática de radiador está conectada.
Prefere uma configuração mais fácil com um Blueprint do Home Assistant?
Você também pode configurar o sensor de temperatura externo usando o nosso Blueprint do Home Assistant, sem configurar manualmente o acionador, a ação e os IDs das entidades.
👉 Configure um sensor de temperatura externo usando o Blueprint do Home Assistant
Se preferir uma configuração manual ou quiser entender como funciona a sincronização da temperatura, continue com as etapas abaixo.
Pré-requisitos
Antes de começar, certifique-se de que:
- O SONOFF TRV-ZBT foi adicionado com sucesso ao Home Assistant.
- O sensor de temperatura externo foi adicionado com sucesso ao Home Assistant e pode informar a temperatura corretamente.
- O TRV-ZBT e o sensor de temperatura externo usam a mesma unidade de temperatura. Recomenda-se usar graus Celsius (°C) para ambos.
- Você confirmou o ID da entidade do sensor de temperatura externo, por exemplo:
|
Método de integração |
Exemplo de ID da entidade do sensor de temperatura externo |
|
ZHA |
|
|
Zigbee2MQTT (Z2M) |
|
Você pode encontrar o ID da entidade acessando:
-
- Ferramentas do desenvolvedor → Estados
- Insira o nome do dispositivo do sensor de temperatura externa na caixa de pesquisa, encontre a entidade Temperature que representa a temperatura atual e copie o ID completo da entidade. Você usará esse ID da entidade ao configurar o acionador da automação e a ação YAML.

Os IDs das entidades podem variar dependendo do método de integração, do nome do dispositivo e da configuração do usuário. Use o ID real da entidade de temperatura mostrado em Ferramentas do desenvolvedor → Estados.
Etapa 1: Criar uma automação
No Home Assistant, acesse: Configurações → Automações e cenas & → Automações
- Clique em Criar automação no canto inferior direito e selecione Criar nova automação.
- O nome recomendado para a automação é: Sincronizar temperatura remota com o SONOFF TRV-ZBT.
- Você também pode diferenciar as automações pelo nome do cômodo, por exemplo: Ssincronizar temperatura do quarto com o TRV-ZBT

Etapa 2: Configurar o acionador
Na seção When , clique em Adicionar acionador e selecione Estado.
- Em Entity, insira ou cole o ID da entidade de temperatura do sensor de temperatura externa que você encontrou anteriormente em Ferramentas do desenvolvedor → Estados e selecione a entidade correspondente nos resultados da pesquisa.
- Deixe Attribute, From e To vazios. Isso garante que a automação seja acionada sempre que o sensor de temperatura externa informar um novo valor de temperatura.
Recomenda-se monitorar apenas as alterações na entidade de temperatura. Não selecione o nível da bateria, a intensidade do sinal ou outros atributos, pois isso pode acionar ações de sincronização desnecessárias.

Opção 1: TRV conectado ao Home Assistant via ZHA
Etapa 3: Habilitar a fonte de temperatura externa
Abra a página do dispositivo TRV-ZBT e confirme que:
- O sensor de temperatura externa está habilitado ou selecionado como fonte de temperatura externa.
- A entidade de valor do sensor de temperatura externa está disponível na página.

Etapa 4: Confirmar a entidade de entrada de temperatura externa
- Na página do dispositivo TRV-ZBT no Home Assistant, confirme se a seguinte entidade Number está disponível para receber a temperatura externa: Valor do sensor de temperatura externa
- Se várias entidades de temperatura com nomes semelhantes aparecerem na página do dispositivo, confirme o ID completo da entidade acessando: Ferramentas do desenvolvedor → Estados.
- Pesquise o nome do dispositivo TRV-ZBT e localize a entidade Número correspondente. O ID da entidade geralmente contém: external_temperature_sensor_value
- Por exemplo: number.sonoff_trv_zbt_external_temperature_sensor_value
- Copie o ID completo da entidade. Na próxima etapa, cole-o na caixa de pesquisa de entidades em Destino e selecione a entidade correspondente.
Dica: sempre verifique o ID completo da entidade para evitar selecionar acidentalmente a entidade de temperatura-alvo do TRV ou a entidade de temperatura local.

Etapa 5: Adicionar a ação para gravar a temperatura externa

- Na seção Depois faça , clique em Adicionar ação e pesquise e selecione: Número: definir
- Em algumas versões do Home Assistant, essa ação pode aparecer como: Definir valor numérico
- Na caixa de pesquisa de entidades em Destino, cole o ID da entidade de entrada de temperatura externa do TRV-ZBT copiado na etapa anterior e selecione a entidade correspondente nos resultados da pesquisa. Por exemplo, a entidade correspondente pode ser exibida como: Valor do sensor de temperatura externa
Se vários dispositivos TRV-ZBT estiverem instalados, verifique cuidadosamente o nome do dispositivo e o local do cômodo para evitar sincronizar a temperatura com a válvula termostática errada.
- Em seguida, clique no menu de três pontos no canto superior direito da ação e selecione Editar em YAML.

Altere o conteúdo da ação para:
action: number.set_value
target:
  entity_id: number.sonoff_trv_zbt_external_temperature_sensor_value
data:
  value: "{{ states('sensor.sonoff_snzb_02dr2_temperature') | float }}"
Neste exemplo:
- sensor.sonoff_snzb_02dr2_temperature é o ID da entidade do sensor de temperatura externa.
- number.sonoff_trv_zbt_external_temperature_sensor_value é o ID da entidade do valor de temperatura externa do TRV-ZBT.
Dica: substitua estes IDs de entidade pelos IDs reais exibidos na sua instância do Home Assistant. Não copie os IDs de exemplo diretamente.
Opção 2: TRV conectado ao Home Assistant via Zigbee2MQTT (Z2M)
Etapa 3: selecione a fonte de temperatura externa
- Abra a página do dispositivo TRV-ZBT no Home Assistant.
- Encontre o Sensor de temperatura e defina-o como: externa
- externa significa que o TRV usará a temperatura externa informada a ele para o controle da temperatura.
- external_2 e external_3 são outras opções reservadas de fonte de temperatura externa. Se você estiver configurando apenas um sensor de temperatura externa, selecione external.

Etapa 4: Confirmar a entidade de entrada de temperatura externa

- Nas entidades do dispositivo TRV-ZBT no Home Assistant, localize a entidade Number usada para gravar a temperatura externa.
- Em algumas versões do Z2M e do Home Assistant, essa entidade pode ser exibida simplesmente como Temperatura na página do dispositivo e pode ter o mesmo nome exibido que a entidade de temperatura-alvo do TRV. Isso é normal.
- Confirme o ID completo da entidade acessando: Ferramentas do desenvolvedor → Estados.
- Pesquise o nome do dispositivo TRV-ZBT ou o endereço IEEE e localize a entidade Number cujo ID contenha: external_temperature_input.
- Por exemplo: number.0xa4c138a1e838ed59_external_temperature_input
Mesmo que a entidade seja exibida como Temperatura na página do dispositivo, ela é a entidade correta para receber a temperatura externa, desde que o ID completo da entidade contenha 'external_temperature_input'.
Depois de confirmar, copie o ID completo da entidade. Na próxima etapa, cole-o na caixa de pesquisa de entidades em Alvo e selecione a entidade correspondente.
Não selecione uma entidade apenas com base no nome exibido. Sempre confirme usando o ID completo da entidade.
Etapa 5: Adicionar a ação para gravar a temperatura externa

- Na seção Depois, faça, clique em Adicionar ação e pesquise e selecione: Número: Definir, ou Definir valor do número
- Na caixa de pesquisa de entidades em Alvo, cole o ID da entidade de entrada de temperatura externa do TRV-ZBT copiado na etapa anterior e selecione a entidade correspondente nos resultados da pesquisa.
- Em seguida, clique no menu de três pontos no canto superior direito da ação e selecione Editar em YAML.

- Digite:
action: number.set_value
target:
entity_id: number.0xa4c138a1e838ed59_external_temperature_input
data:
value: "{{ states('sensor.0xd44867fffe0f8731_temperature') | float }}"
Neste exemplo:
- O sensor.0xd44867fffe0f8731_temperature é o ID da entidade do sensor de temperatura externa.
- O number.0xa4c138a1e838ed59_external_temperature_input é o ID da entidade de entrada de temperatura externa do TRV-ZBT.
Substitua esses IDs de entidade pelos IDs de entidade reais exibidos na sua instância do Home Assistant.
Se você não encontrar uma entidade que contenha external_temperature_input no Home Assistant, primeiro verifique se o item Temperatura externa está exposto na página do dispositivo TRV-ZBT no Z2M. Se não estiver exibido, atualize o Z2M e o conversor do dispositivo e verifique novamente.
Etapa final: salve e ative a automação
- Após concluir a configuração, clique em Salvar para salvar a automação.
- Retorne à lista de automações e confirme se o interruptor ao lado da automação está ativado.
- A partir deste momento, sempre que o sensor de temperatura remoto informar uma nova temperatura, o Home Assistant a sincronizará automaticamente com o TRV-ZBT.
Verifique se a configuração foi bem-sucedida
Siga estas etapas para confirmar se a automação está funcionando corretamente:
- Abra a página do dispositivo do sensor de temperatura externa e anote a temperatura atual.
- Aguarde o sensor informar uma nova leitura de temperatura. Para acelerar o teste, segure levemente o sensor ou mova-o temporariamente para uma área com uma temperatura ligeiramente diferente, a fim de provocar uma alteração na leitura.
- Abra a página do dispositivo TRV-ZBT.
- Confirme se o TRV-ZBT foi sincronizado com sucesso e está usando a temperatura externa:
-
- Verifique se o valor da entrada de temperatura externa do TRV-ZBT foi atualizado para corresponder à temperatura atual informada pelo sensor de temperatura externa.
- ZHA: Verifique Valor do sensor de temperatura externa. O ID da entidade Number contém external_temperature_sensor_value.
- Z2M: Verifique a entidade Number cujo ID de entidade contém external_temperature_input. Essa entidade pode ser exibida como Temperatura na página do dispositivo.
- Confirme também se a temperatura atual exibida pelo TRV-ZBT foi atualizada para o valor da temperatura externa. Você pode verificar a temperatura Atualmente exibida no cartão do termostato.
- Verifique se o valor da entrada de temperatura externa do TRV-ZBT foi atualizado para corresponder à temperatura atual informada pelo sensor de temperatura externa.
5. Retorne à página da automação e confirme se Última execução exibe um horário de execução recente.
Você também pode abrir a automação, clicar no menu de três pontos no canto superior direito da ação e selecionar Executar ação para testar manualmente se a temperatura pode ser gravada com sucesso no TRV-ZBT.


Deixar comentário
Os comentários precisam ser aprovados antes da publicação.
Este site é protegido por hCaptcha e a Política de privacidade e os Termos de serviço do hCaptcha se aplicam.