


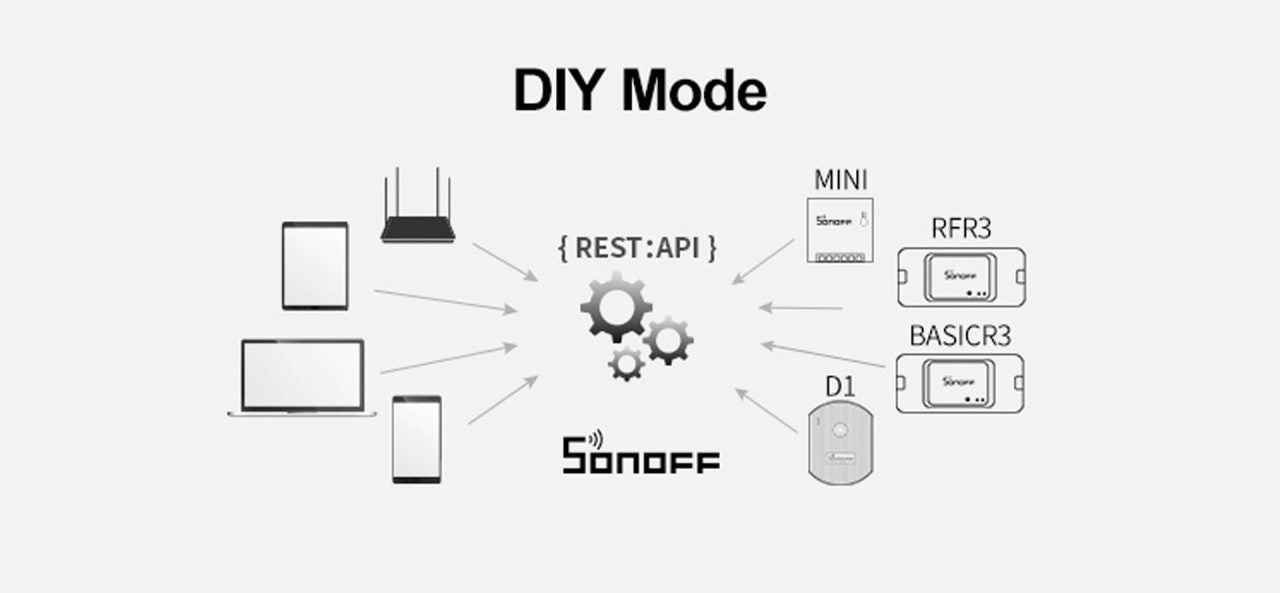
Did you ever expect to control the SONOFF device by your own application without Tasmota firmware flash? Since the middle of 2019, SONOFF released a DIY mode for BASICR3, RFR3, MINI and D1 that users are able to discover the SONOFF device via mDNS discovery mechanism as well as control the device according to the published REST API protocol.
Let’s call the first version of the DIY mode as Edition 1.0, as some of home-automation community members know, when the device is switched into DIY mode, it connects with a specific WiFi network which is defined by SONOFF. The device's WiFi configuration setting can be changed via the tool from GitHub. Now! SONOFF develops DIY mode 2.0, which is much easier and faster to switch into DIY mode and set up the device.
Let’s check it out and see how easy and speedy to set up a DIY mode device in minutes!

The way to switch into DIY mode of the new version (2.0) is totally different from the 1.0 one. No enclosure disassembly and jumper plug-in is needed, in DIY mode 2.0, long pressing the pairing button for seconds leads the device switch into Compatible Pairing Mode (AP), which sets the device as Access Point. A hotspot of the Access Point can be found in the name of ITEAD-XXXXXXX (password: 12345678), connect to it!

A web page for the configuration of the Wi-Fi network that the device will connect with is stored in DIY mode device which can be accessed by the URL of http://10.10.7.1/ as shown below. After configuring the SSID and Password, the device will reboot and connect with the WiFi network that was just entered.

With a successful WiFi network connection, the device will be blinking in this way as shown below. Device IP address appears in the router management dashboard.

Wow, the device is under your control now!
As you can check the REST API protocol from SONOFF website developer page, the capability includes ON&OFF Switch, Power-On State, Inching, network SSID and password reset, signal strength, retrieve device info etc.
Let’s try to control the SONOFF device [1] with ON&OFF, Inching and retrieve device info via Postman application. As we know from the developer page of DIY mode protocol, ON&OFF control is defined by sending an HTTP request to the URL of http://[ip]:[port]/zeroconf/switch,
{
    "deviceid": "",
    "data": {
        "switch": "on"
    }
 }
| Attribute | Type | Optional | Description |
|---|---|---|---|
| switch | String | No | on: turn the switch on, off: turn the switch off |
Here is the demo of ON&OFF in Postman:

The inching function is available to be controlled via the request as below
URL: http://[ip]:[port]/zeroconf/pulse
{
    "deviceid": "",
    "data": {
        "pulse": "on",
        "pulseWidth": 2000
    }
 }
| Attribute | Type | Optional | Description |
|---|---|---|---|
| pulse | String | No | on: activate the inching function; off: disable the inching function |
| pulseWidth | Number | Yes | Required when “pulse” is on, pulse time length, positive integer, ms, only supports multiples of 500 in range of 500~36000000 |

Now the inching setting is on with pulsewidth 2000ms, thus, when the device is turned on, it will automatically turn off after 2000ms.
To get the device info, send a request via a URL request of
http://[ip]:[port]/zeroconf/info.
{
    "deviceid": "",
    "data": { }
 }
Empty object, no attribute is required.
A response feedback of the device info is coming.

How easy the whole process is, isn’t it?
PS: DIY mode 2.0 is available for the device (BASICR3, RFR3 MINI and D1) with firmware 3.5.0, if the device firmware is below 3.5.0, update the firmware via eWeLink APP is needed.
Dimmer product DIY Mode tutorial:
The process of device setup and control becomes more convenient and speedy. The real sense of DIY mode is to explore the way to control the SONOFF device [1] and save time from no Tasmota firmware flash, without eWeLink cloud going through, you are still able to get full control of the SONOFF device [1], integrate the device in the home-automation platform such as Home Assistant, OpenHAB, Homeseer, etc, which makes more possibilities happen.
Control the SONOFF device in the way you want, enjoy the home-automation journey!
By the way, more SONOFF products will be integrated with DIY mode, stay tuned!
SONOFF, Your Smart Choice.
PS: [1] The SONOFF device refers to BASICR3, RFR3, MINI and D1.

Leave a comment
All comments are moderated before being published.
This site is protected by hCaptcha and the hCaptcha Privacy Policy and Terms of Service apply.