
Einführung
Viele Menschen bedienen ihr Garagentor täglich noch mit Fernbedienung, Wandtaster oder physischem Schlüssel. Wir kennen das alle: halb auf der Straße, in Panik, weil man nicht prüfen kann, ob die Tür geschlossen ist, also dreht man um. Oder im Dunkeln herumtasten, weil man die Fernbedienung nicht findet. Oder bei starkem Regen nach Hause kommen und aussteigen müssen, nur um den Wandtaster zu drücken.
Also beginnen Sie, sich smarte Garagentorsysteme anzusehen. Aber die meisten – wie MyQ, Chamberlain oder LiftMaster – sind auf Cloud-Dienste angewiesen. Sie bieten keine echte lokale API, werfen Datenschutzbedenken auf und funktionieren nicht immer reibungslos mit Home Assistant. Was Sie wirklich wollen, ist lokale Kontrolle: Status prüfen, Öffnen/Schließen vom Handy aus und zuverlässige Automatisierungen bauen, ohne auf fremde Server angewiesen zu sein.
Jetzt fragen Sie sich: Kann ich mein bestehendes Garagentor an Home Assistant anschließen? Muss ich einen komplett neuen Öffner kaufen?
Die gute Nachricht? Die meisten Garagentore funktionieren mit Home Assistant, ohne den vorhandenen Öffner auszutauschen. Alles, was Sie brauchen, ist ein Trockenkontakt-Smart-Relais (um das Drücken des Wandtasters zu simulieren) und ein Türsensor (zur Erkennung des geöffneten/geschlossenen Zustands). Einmal mit Home Assistant verbunden, können Sie Ihr Garagentor steuern, überwachen und automatisieren – alles läuft lokal, ohne Cloud.
In diesem Leitfaden erklären wir, wie ein Garagentoröffner funktioniert, warum Trockenkontakt-Relais die gängigste DIY-Lösung sind und wie Geräte wie der SONOFF MINI-D (Wi-Fi) und MINI-ZBD (Zigbee) Ihnen helfen können, eine einfache und zuverlässige Garagentorsteuerung mit lokaler Kontrolle zu bauen.

Was ist ein Home Assistant Garagentoröffner?
In einer Home Assistant-Konfiguration bedeutet „Garagentoröffner“ meist mehr als nur den Motor, der die Tür hebt. Es bezeichnet ein komplettes intelligentes Garagentorsteuerungssystem, das aus drei Hauptkomponenten besteht:
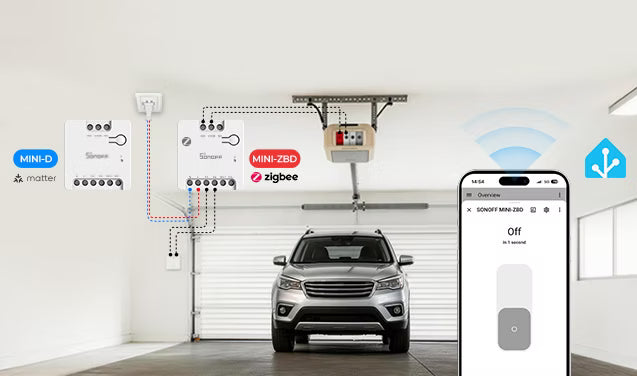
● Ein physischer Controller – normalerweise ein Trockenkontakt-Relais wie der SONOFF MINI-D oder MINI-ZBD – fungiert wie ein Fernbedienungs-Wandtaster. Beim Auslösen schließt es kurz den Stromkreis und signalisiert dem Garagentorantrieb, zu öffnen oder zu schließen.
● Ein Türsensor – ein einfacher Reed-Schalter (Tür-/Fenstersensor) oder ein Neigungssensor, der die Türposition erkennen kann. Das ist wichtig, weil das Relais selbst nur ein Auslösesignal sendet – es kennt die tatsächliche Türposition nicht.
● Home Assistant-Integration – HA kombiniert das Relais und den Sensor zu einer einzigen Cover-Entität. So erscheint das Garagentor in Dashboards, Automatisierungen und Sprachassistenten als ein intelligentes Gerät mit Steuerungen zum Öffnen und Schließen.
Wie funktioniert die Garagentorsteuerung mit Home Assistant?
Die meisten Garagentorsysteme funktionieren über eine einfache Wandtasterverbindung. Wenn der Taster gedrückt wird, erkennt der Garagentoröffner ein Kurzschlusssignal und beginnt, das Tor zu öffnen oder zu schließen.
Ein smartes Trockenkontakt-Relais funktioniert genauso, außer dass Sie es aus der Ferne über Home Assistant auslösen. Wenn es von Home Assistant ausgelöst wird, schließt es kurzzeitig den Trockenkontakt-Stromkreis und sendet dasselbe Signal wie das physische Drücken des Garagentor-Tasters.
● Wandtaster gedrückt → Stromkreis geschlossen → Motor läuft
Aber es gibt einen Haken. Das Trockenkontakt-Relais kann nur das Tor steuern. Es kann nicht erkennen, ob das Tor offen oder geschlossen ist. Deshalb benötigen Sie einen Reed-Sensor, Neigungssensor oder Tür-/Fenstersensor zur Statuserkennung. Ohne Sensor ist Home Assistant blind – es kann nicht sagen, ob das Garagentor offen oder geschlossen ist.
Eine typische DIY-Home-Assistant-Garagentoröffner-Konfiguration sieht normalerweise so aus:
● Trockenkontakt-Smart-Relais zur Steuerung
● Türsensor zur Statuserkennung
● Home Assistant für Automatisierung und Fernzugriff
Dieser Ansatz ist beliebt, weil er erschwinglich ist, lokal funktioniert und normalerweise keinen Austausch des bestehenden Garagentoröffners erfordert.
Müssen Sie Ihren bestehenden Garagentoröffner ersetzen?
Nein – in fast allen Fällen müssen Sie nichts ersetzen.
Solange Ihr Garagentoröffner eine Wandtasterverbindung unterstützt – was bei den meisten modernen Systemen der Fall ist – können Sie in der Regel ein Trockenkontakt-Relais hinzufügen. Das Relais wird parallel zu Ihrem vorhandenen Wandtaster geschaltet, und beide funktionieren unabhängig voneinander – an Ihrer aktuellen Einrichtung ändert sich nichts.
Es gibt ein paar Ausnahmen, bei denen ein Standard-Trockenkontakt-Relais möglicherweise nicht funktioniert:
● Einige neuere Chamberlain- und LiftMaster-Modelle mit Security+ 3.0 verwenden ein verschlüsseltes digitales Signal anstelle eines einfachen Kontakttriggers. Ein Trockenkontakt-Relais funktioniert bei diesen nicht.
● Sehr alte oder ungewöhnliche Öffner mit Hochspannungsanschlüssen am Wandtaster. Die meisten Garagentoröffner verwenden Niederspannungssignale an den Wandtasteranschlüssen (typischerweise 12–24 V AC/DC), die für Trockenkontakt-Relais sicher sind. Einige wenige ältere oder nicht standardmäßige Geräte können jedoch Netzspannung (120 V/240 V) an diesen Anschlüssen verwenden.
Bevor Sie ein Smart-Relais an Ihr Garagentor anschließen, überprüfen Sie das Handbuch Ihres Garagentoröffners, um zu bestätigen, wie die Wandtasteranschlüsse funktionieren.
*Im Zweifelsfall verwenden Sie ein Multimeter, um die Spannung an den Anschlüssen zu messen – oder fragen Sie einen zugelassenen Elektriker um Hilfe.
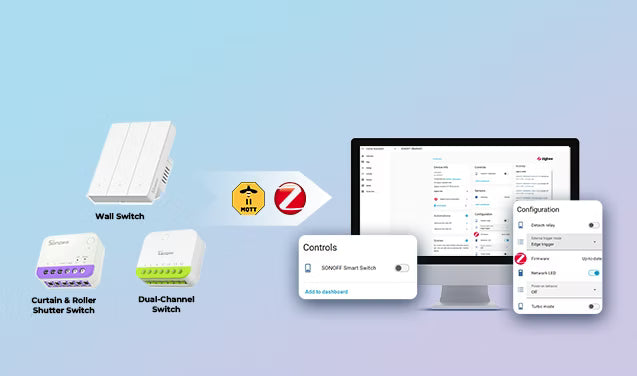
MINI-D vs MINI-ZBD Trockenkontakt-Relais für Home Assistant Garagentore
MINI-D
SONOFF MINI-D ist ein Matter-fähiger Trockenkontakt-Smart-Switch, der für Niederspannungs-Steuergeräte wie Garagentore, Tore, Kessel und DC-Motoren entwickelt wurde. Er unterstützt sowohl NO- als auch NC-Modi und funktioniert mit AC- oder DC-Stromeingang. Mit Matter-Unterstützung kann MINI-D in Home Assistant für lokale Steuerung und intelligente Automatisierungen integriert werden.

SONOFF MINI Trockenkontakt Wi-Fi Smart Switch | MINI-D
$14.90
【Matter-kompatibel – plattformübergreifende Smart-Home-Integration】Der SONOFF MINI-D ist ein Matter-zertifizierter Smart Switch, der für die nahtlose Integration mit Matter-fähigen Plattformen wie Amazon Alexa, Google Home, Apple Home, Home Assistant und mehr entwickelt wurde. Genießen Sie mühelose Steuerung von Smart-Geräten verschiedener Marken, alles über ein einheitliches Ökosystem. Bauen Sie mit Matter-Technologie ein wirklich interoperables Smart Home auf...
Produkt ansehenMINI-ZBD
SONOFF MINI-ZBD ist ein Zigbee-Trockenkontakt-Smart-Relais, das sowohl NO- als auch NC-Konfigurationen unterstützt. Es funktioniert mit AC- oder DC-Stromeingang und kann über ZHA oder Zigbee2MQTT mit Home Assistant verbunden werden. Es arbeitet auch als Zigbee-Router und verbessert so die Zigbee-Mesh-Abdeckung und Stabilität.

SONOFF MINI Trockenkontakt Zigbee Smart Switch | MINI-ZBD
$14.90
【Intelligente Zigbee-Integration & Signalweiterleitung】Unterstützt das Zigbee-Protokoll und funktioniert mit Zigbee-Hubs für Fernsteuerung, Sprachbefehle, intelligente Zeitplanung und erweiterte Automatisierung über die eWeLink-App oder Plattformen wie Home Assistant. Es fungiert auch als Zigbee-Router, um die Mesh-Abdeckung zu erweitern und Signal-Löcher zu reduzieren...
Produkt ansehenMINI-D vs MINI-ZBD
Beide Geräte funktionieren als Garagentoröffner-Relais in Home Assistant – wählen Sie je nach Ihrer bestehenden Einrichtung.
|
Funktionen in Home Assistant |
MINI‑D (Matter) |
MINI‑ZBD (Zigbee) |
|
Home Assistant-Integration |
Matter-Integration |
ZHA oder Zigbee2MQTT |
|
Lokale Steuerung (ohne Cloud) |
✅ |
✅ |
|
AN/AUS |
✅ |
✅ |
|
Einschaltzustand |
❌ |
✅ |
|
Abgekoppelter Relais-Modus |
❌ |
✅ |
|
OTA |
❌ |
✅ |
|
Turbo-Modus |
❌ |
✅ |

Wie fügt man einen Garagentoröffner zu Home Assistant hinzu?
Der genaue Einrichtungsprozess kann je nach Modell Ihres Garagentoröffners und des verwendeten Smart-Relais variieren, aber der allgemeine Ablauf ist meist sehr ähnlich.
So funktioniert die grundlegende Einrichtung:
Schritt 1: Verdrahten Sie das Trockenkontakt-Relais mit dem Garagentormotor
Das Trockenkontakt-Relais ist an dieselben Wandtasteranschlüsse angeschlossen, die auch vom Garagentoröffner verwendet werden. Wenn es ausgelöst wird, schließt das Relais kurzzeitig den Stromkreis und simuliert das Drücken des Wandtasters.

Hinweis:
- Schalten Sie vor jeglicher Verdrahtung immer den Strom aus und lesen Sie das Handbuch des Garagentoröffners.
- Zur Sicherheit befolgen Sie stets die mit Ihrem Gerät gelieferten Verdrahtungsanweisungen oder konsultieren Sie bei Bedarf einen qualifizierten Elektriker.
Schritt 2: Relais zu Home Assistant hinzufügen
Für Zigbee-Trockenkontakt-Relais:
- Sie benötigen einen Zigbee-Koordinator (wie SONOFF ZBDongle-P, ZBDongle-E) sowie ZHA oder Zigbee2MQTT.
- Versetzen Sie es in den Kopplungsmodus und fügen Sie es über Zigbee2MQTT oder ZHA hinzu.
- Es erscheint als Schalter-Entität. Benennen Sie es in etwas wie „Garagentor-Relais“ um.
👉 Schritt-für-Schritt Einrichtungsanleitung: Wie man Zigbee-Geräte über ZHA und Zigbee2MQTT zu Home Assistant hinzufügt
Für Matter-Trockenkontakt-Relais:
- Sie müssen die Home Assistant Companion App auf Ihrem Smartphone installieren.
- Fügen Sie es über die Matter-Integration in Home Assistant hinzu (Einstellungen → Geräte & Dienste → Integration hinzufügen → Matter).
- Scannen Sie den Matter-QR-Code vom Gerät.
👉 Schritt-für-Schritt Einrichtungsanleitung: Wie man ein Matter-Gerät zu Home Assistant hinzufügt
Schritt 3: Garagentorsensor hinzufügen
Als Nächstes koppeln Sie den Garagentorsensor (wie SONOFF SNZB-04P, SNZB-04PR2) auf die gleiche Weise mit Home Assistant. Der Sensor ermöglicht es Home Assistant, zu erkennen, ob das Garagentor offen oder geschlossen ist. Dies ist wichtig für zuverlässige Automatisierungen und Statusverfolgung.
👉 Beste Zigbee Tür- & Fenster-Sensoren für Home Assistant: Einrichtungs- und Automatisierungsanleitung
Schritt 4: Grundlegende Sicherheitsautomatisierung
Nach der Einrichtung können Sie Garagentor-Automatisierungen basierend auf Zeitplänen, Sensoren, Anwesenheitserkennung oder Sicherheitsbedingungen erstellen.
Nützliche Garagentor-Automatisierungen in Home Assistant
Garagentor automatisch schließen
Wenn das Garagentor zu lange offen bleibt, kann Home Assistant es nach einer festgelegten Zeit automatisch schließen. Nützlich, wenn Sie nach dem Ausladen des Autos vergessen haben, es zu schließen.
💡Legen Sie einen Auslöser fest: Türsensor wechselt für 10 Minuten in den Status „offen“ → Aktion: Schließbefehl ausführen.
Benachrichtigungen senden, wenn die Tür offen bleibt
Home Assistant kann eine Benachrichtigung an Ihr Telefon senden, wenn das Garagentor spät in der Nacht oder wenn niemand zu Hause ist, offen bleibt. Dies verbessert die Haussicherheit und verhindert, dass das Garagentor versehentlich offen bleibt.
💡Legen Sie einen zeitbasierten Auslöser fest (z. B. 22:30 Uhr), Bedingung: Tür ist offen, Aktion: Senden Sie eine Push-Benachrichtigung an Ihr Telefon über die Home Assistant Companion App.
Fazit
Der Aufbau eines Home Assistant Garagentoröffners ist meist viel einfacher als viele erwarten. In den meisten Fällen müssen Sie den vorhandenen Garagentoröffner nicht ersetzen. Durch Hinzufügen eines Trockenkontakt-Smart-Relais und eines Garagentorsensors können Sie lokale Steuerung, Fernzugriff und smarte Automatisierungen zu Ihrem aktuellen System hinzufügen.
Geräte wie der SONOFF MINI-D und der MINI-ZBD bieten eine einfache Möglichkeit, Garagentore in Home Assistant zu integrieren. Egal, ob Sie Wi-Fi oder Zigbee bevorzugen, beide Optionen helfen dabei, ein zuverlässiges und flexibles Smart-Garagen-Setup zu schaffen.
Sobald Ihr Garagentor mit Home Assistant verbunden ist, wird es Teil Ihres Smart Homes – inklusive Automatisierungen, Benachrichtigungen und Fernzugriff.
FAQ
F1: Kann Home Assistant mein Garagentor aus der Ferne öffnen?
Ja. Solange Ihre Home Assistant-Instanz erreichbar ist, können Sie Ihr Garagentor von überall auf der Welt öffnen und schließen.
F2: Brauche ich eine Internetverbindung, damit das funktioniert?
Nein. Das Relais und der Sensor kommunizieren direkt mit Home Assistant über Ihr lokales Netzwerk. Das Internet wird nur für Fernzugriff oder Benachrichtigungen benötigt.
F3: Kann ich meinen vorhandenen Wandtaster nach der Installation des Relais behalten?
Ja. Das Relais wird parallel zum Wandtaster angeschlossen. Beide funktionieren unabhängig voneinander. An Ihrer bestehenden Einrichtung ändert sich nichts.
F4: Ist ein Trockenkontaktrelais sicher für die Verwendung mit einem Garagentor?
Ja. Der Trockenkontaktausgang ist spannungsfrei – es ist nur ein Schalter, der kurz schließt. Er speist keine Energie in die Garagentoranschlüsse ein. Bei korrekter Verwendung mit kompatiblen Systemen sind Trockenkontaktrelais in der Regel sicher für die Garagentorsteuerung.
F5: Welchen Sensor sollte ich verwenden, um zu erkennen, ob die Tür offen oder geschlossen ist?
Ein Standard-Tür-/Fensterkontaktsensor funktioniert gut. Für Zigbee-Setups sind der SONOFF SNZB-04P und der SNZB-04PR2 gute Optionen. Montieren Sie den Sensor an der Tür und den Magneten am Rahmen – wenn die Tür geöffnet wird, trennen sich Sensor und Magnet, sodass Home Assistant erkennen kann, dass das Garagentor offen ist.
Hinterlasse einen Kommentar
Alle Kommentare werden vor der Veröffentlichung geprüft.
Diese Website ist durch hCaptcha geschützt und es gelten die allgemeinen Geschäftsbedingungen und Datenschutzbestimmungen von hCaptcha.